Showing posts with label diy. Show all posts

Thursday, July 5, 2012

Beauty with the Burgundy Girls

We recently wrote an article that was published in the new vive magazine about some of our favourite beauty icons and we had so much fun with it that we just had to share it with you all. (Also, we had to cut the words down for the mag and wanted to share the full version online.) Check out the real deal by tracking down one of those elusive issues of vive at your favourite boutiques around the city.


Always looking to celebs for beauty inspiration? Us too. We love to take our cues from ladies who are outside the typical beauty box.

The look: The Back-to-Basics

Mariel Hemingway

We love Mariel’s laidback approach to beauty, typified by her cool-girl appearance in Woody Allen’s Manhattan. An easy centre-part, a fresh (read: no makeup) face, and some major eyebrows put her delicate features on display. Don’t be afraid to try this bare-faced look–the strong brow (and maybe a little mascara and blush) will lead the way.

Seen on: This simplicity can be seen on the off-duty looks of Cara Delevingne and Arizona Muse

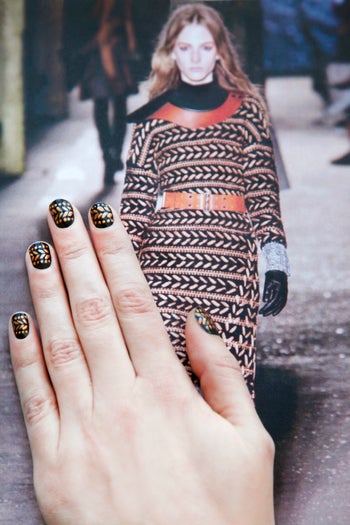
A modern-day version
 How to:
To fill in those eyebrows, go for Anastasia Brow Powder Duo in “Medium brown”
This two-toned powder will enhance your brows and make them look as naturally full as Mariel’s. Use a thin, angled brush to apply, and finish with a cream or wax to keep everything in place.

Her flawless skin can be mimicked by a full layer of Garnier BB Cream in “Light/Medium”
This stuff–part sunscreen, tinted moisturizer, primer, foundation, and illuminizer–works wonders. Without caking on a lot of product, your skin will look radiant and, most importantly, clear.

A no-nonsense hairstyle is aided by Goody’s Quik Style Paddle Brush
This brush a quick and easy way to get the moisture out your hair while getting those 100 strokes a day.


The lookThe Hot Mess

Courtney Love


With her babydoll dresses, combat boots, and ripped fishnets, Courtney Love’s grunge grrl style took the ‘90s by storm. At once little girl and hard rocker, her rough ’n tumble look straddles that period between being a teenager and a grown up—think “not a girl, not yet a woman,” but with chain-smoking and whiskey. Roll out of bed with last night’s makeup on, smear on some red lipstick, and you’re ready to roll.

Seen on: This disheveled look (and bad-girl lifestyle) seems to come naturally to Taylor Momsen and Charlotte Free

A little more wearable, no?
How to:
Make your lips pop with M.A.C lipstick in “Russian Red”
A bold, bluish red with a matte finish, this lipstick’s got plenty of staying power–perfect for all-nighters. For extra security, apply a liner first–this will stop the colour from smudging out.

Layer your eyes with Stila Smudge Crayon in “Black”
Hate taking off your makeup at night? This thick black pencil is perfect for layering on day after day. But for those who are more feint of heart, applying the kohl to your waterlines and smudging outwards will do the trick.

Muss up your hair with Lakme K.Style Hottest: Chalk
Tap this fragrance-free dust on your roots and rough it up–you get all the matte texture and mega volume of bedhead, without a full 8 hours or a morning tumble in the hay.


The look: The Peacock


Nicki Minaj

This hiphop babe likes to claim she’s not like Barbie, but her style is ripped right from little girls’ scrapbooks–exaggerated everything in technicolor hues, from toes to the top of her teased weaves. This master chameleon is comfortable in every colour, her style speaks to the fantasy of beauty generally, how playing dressup can be artfully done. Embrace her playful attitude by embracing rich colours–this is your time to shine, princess.

Seen on: Other starlets rocking this over-the-top look are cat lady Katy Perry, M.I.A, and the rainbow-hued tresses of Azealia Banks.

Slightly more tame.
How to:
Paint your lids with Makeup Forever Aqua Cream in “21–Turquoise” or “18–Mauve”
We couldn’t decide which was more Ms. Minaj, but either one will do the trick. Since it’s cream eyeshadow, the colour will stay strong and won’t settle in your creases.

Pucker up with Smashbox Be Legendary Lips in “Pout”
Creamy pink lips are a staple for this gal. Make sure to get a highly pigmented colour for super opaque coverage. The more cotton candy coloured the better. You can even put some high shine gloss overtop.

Have some fun with Colour Bug by Kevin Murphy in “Purple”
These solid hair shadows are perfect for changeable colour creatures–in one night, out the next.

Tuesday, April 10, 2012

Easter Leftovers


That's a brisket pizza, folks!

I had a bunch of leftover brisket from my Easter dinner on Sunday night, so I decided to do something creative. After reading a super-simple looking pizza dough recipe from the latest issue of Lucky Peach (taken from Wolfgang Puck), I was itching to make it myself. It was easy, and possibly the best dough I've ever tasted. I topped the dough with barbecue sauce (Caioti-style), grated parmesan, and thinly sliced brisket pieces. It was heaven, and completely un-Kosher.

The final product.

Here's an even more simplified version of the dough that you should try, like tomorrow. I also have a lot of extra dough (this recipe makes 4 good-sized balls of dough), so if you're local you can swing by and I'll give you some of mine.

Lucky Peach's All-purpose Pizza Dough:
Makes 4 dough balls

1 packet active dry yeast
1.5 cups warm water
1 tablespoon honey
2 tablespoons EVOO
3–4 cups all-purpose flour
1.5 teaspoons Kosher salt

1. Let yeast dissolve in the water, then add honey and EVOO and stir.
2. Mix together flour and salt, and add to the water.
3. Now things are going to get messy. Mix the dough together with your hands. It's going to be really goopy and stick to your hands. If it's unworkable just add more flour, little by little. Eventually it'll stop sticking to your hands, and then you'll know you're ready to move on to the next step.
4. Put the dough in a lightly oiled bowl and cover tightly with Saran wrap. Leave it alone to rise for about half an hour.
5. Divide the dough into four parts and follow the next steps for each piece. Shape each ball by pulling the sides of the dough outwards and tucking it underneath the bottom. After a few minutes, roll the dough into a ball between your palm and a clean surface.
6. Put the dough balls onto a platter and cover with lightly oil Saran. Leave them for another half an hour.
7. Time to stretch out the dough! I like to hold it near the end, let it stretch down, and keep moving it around in a circle—let gravity help you with this one.

If you're going to use a baking sheet, make sure that you lightly oil it. Bake for 15 minutes or so at about 400, but keep an eye on it. You want it to look nice and toasty before you take it out.

Wednesday, February 29, 2012

Left Field

I suppose if anything could unite the list of things that are inspiring me lately, it's getting the details right: pairing the right colours, the right little flourishes, achieving a harmonious balance.


This bathroom popped up on my Pinterest a couple days ago and I've been dreaming of it ever since. The seafoam and rust colour combo, the standalone soaker tub (siiiiiiigh), and the massive stag head pretty much tickle all my homey bones. And guys! Guess what! It's a real place in Ireland that you can stay! Ballyvolane House of Cork, you're pretty alright.


I've been curious to try these Ballet Beautiful videos as a supplement to my ballet classes – my favourite upper body stretch is great for loosening my shoulders but I'd like to start strengthening all my parts more regularly. Has anyone tried these? Are they as good as they look?


I know, I'm cruel. But how's a gal supposed to focus on getting in shape for her short shorts when Smitten Kitchen goes around posting things like this fried egg sandwich with bacon and blue cheese, huh? Completely unfair, that's what it is. At least it's got veggies in it, I GUESS (but, oh yeah, they're tossed in bacon fat, uh huh).


I'm obsessed with the details of the new Scout & Catalogue Rorschach scarves – all those little hidden skeletons and kitten heads and butterflies captured in a silky, silvery neutral. To top it off, the duo behind Fieldguided did a beautiful job photographing S&C's boho, beachy vibe for the lookbook. (You can see the process to create the scarves here, and more shots from the lookbook here.)


As usual, the Purl Bee knocks one out of the park with this two-tone crocheted cowl. Once I finish the shawl that shall not end, this'll likely be the next thing I cast on. (Is it still called casting on when it's crochet? "Playing hooky?")


Being known as someone who's fairly fearless about wearing crazy nails means you get lots of nail tutorials passed your way. My favourite of late is this one from Refinery 29, based on a print from Rag & Bone 'cause it looks like knitting (thanks for the tip-off, Kim!) But dear lord, is it ever hard to do! I tried it, then ended up starting over and doing this beach blanket/licorice allsorts mani instead, because I was watching Khloe & Lamar and why complicate life further, you know? And then I animated it. Why? Seche Vite fumes, that's why.

gif animator

As always, you can see what I'm digging in realtime on Pinterest.

Thursday, February 23, 2012

Eat It: Taco Pizza

Remember last year, with the butter chicken poutine? How I nearly lost my damn mind? Well, it happened again. And it happened with butter chicken again, although this time it was PIZZA and it was so so so good. My friend Morrison made it and I swear, I reached nirvana. It really opened my eyes to the glorious versatility of the pizza crust. 

Well, this is not a butter chicken pizza recipe (although the jist of that is: butter chicken sauce instead of regular tomato. YOU’RE WELCOME). This is a taco pizza recipe, because I thought, “hey! A pizza crust is just like a big ol’ soft plate of nachos!” And guys, I might never go back. This might beat out real tacos for me, and that sounds like crazytalk, but it’s only crazytalk to someone who hasn’t tried taco pizza. Come on now – it’s time to become a believer.

I remembered to take a picture only after we had attacked –
the draw of the taco pizza was too strong.

Taco Pizza 
Serves three normal people or two hungry people 
From countertop to tabletop: 20 minutes 

Ingredients:
1 package of ground meat (I used turkey, but beef or soy would be equally delicious)
1 package of taco seasoning
1 pizza crust (my grocery stuff was out of fresh dough, so I used a pre-made crust)
At least 2 cups of shredded mozzarella (I used a little cheddar too)
1 quarter of a green pepper, diced
3 green onions, chopped

For Garnish:
Salsa
Sour cream
Avocado or guacamole
Fresh cilantro, chopped


1. If you’re using fresh pizza dough*, sprinkle down a little flour and roll it out. This is no time for thin crust, so go thick because your loaded pizza will need a solid base. A little cornmeal on the underside of the crust would probably just knock your socks off (but if you don’t have cornmeal, there’s no need to go hogwild and buy it – a little flour’ll do). I used a premade crust, so I just stuck it on the pan. Trust me, if this is your only option, just go for it anyway – the effect will still be amazing.

2. Brown your ground turkey, drain any excess grease, and follow the taco seasoning instructions. Usually they’re something like, “add a half cup of water and seasoning, then let simmer for 5 minutes.” Just do that. We’re not reinventing the wheel here. The only thing I’d recommend is not too let it get too dry – you want the meat to still be a saucy in the end.

3. Sprinkle a thin layer cheese on your crust to help keep this delicious mess together. When the taco turkey is ready, spread it thickly overtop, leaving only your crust for grabbin’ clear. Layer your veggies on top – I used green pepper and green onions, but hey! You might like to put diced tomato or corn or black beans or olives or jalapenos, if that’s your kinda thing. Listen to your heart and the contents of your pantry!

4. Sprinkle a thick layer of cheese overtop, then pop that baby in an oven preheated to 400°F. It should start looking good after about 5 minutes, then turn it up to broil for the last minute or two, so the top gets nice and browned.
* If you're using fresh dough, baking will take longer. Your oven should be turned up to about 450°F, and it'll probably take closer to 10–15 minutes.

5. Once your pizza’s baked and you’ve taken it out of the oven comes the hardest part – WAITING. Give it a couple minutes to cool down and stiffen up, so you won’t be trying to eat a burning, messy slice of goo. You’ve waited a few minutes? Okay, slice that pie up.

6. This is the step that took this pizza out of mere good territory and into the realm of greatness – THE TOPPINGS. I spooned a little salsa onto each slice, a couple small dollops of sour cream, a handful of fresh cilantro and a few slices of fresh avocado. Now dig in, you patient thing you – you’ve waited long enough. Eat it like a slice of pizza and bask in the deliciousness.

Bon appetit!

Wednesday, February 8, 2012

Purple Tie Dye Party

On Sunday night, instead of watching the Super Bowl or that awesome 60 Minutes interview on remarkable women (Meryl, Anna, and Dolly! You can watch it here.) I hung out with some of my favourite girls and we tie dyed. It was awesome. We all had a bunch of clothes to dye but we all wanted to use the same colour—and now we're all wearing purple the colour of grape juice.

I opted to dye my amazing sheer-backed shirt that I got from White Crow in the summer. I had more or less stopped wearing it due to a chicken chow mein stain right on the front (which you can still see if you look hard enough, but nevermind!) Dying it proved the perfect opportunity to give it a new life!


 Since the front is cotton and the back is a chiffon-like fabric, the dye took to each side differently, giving the front and back a slightly different colour. I couldn't be happier with the results. The only problem? After an hour with the clothing steamer, I still can't get all the wrinkles out!

Here's a tank that I did.


This was my first foray into dying clothes, and after seeing how easy it is I've now caught some kind of bug. I have so many clothes that I don't wear anymore—an old white button-up, a thin sweater that has a pattern I'm sick of—and with an all-over dye or even a dip dye, I think I could be wearing those pieces again. Who needs to go shopping anyway?


And here, the almost-highlight of the night (after Youtubing the incredible Madonna halftime show, natch), are my friend Sasha's nails. She did these—you're not gonna believe it—by hand. Both hands. It must have taken hours.


Thursday, February 2, 2012

vive magazine issue 4.1

I'm going to have to toot my own horn today because I'm feeling pretty proud of myself: the digital version of vive is now online. The mag looks even better in print, but if you missed our launch party, don't live in Toronto, or are an online-only mag sort of girl, then you are now in luck. 

READ IT HERE!


All I'm allowed to share with you here are teasers of the two major shoots that we did, the first by Dan Epstein and the second by Alan Poon:


So much hard work went into this mag, from the editors on the masthead to the photographers, writers, stylists, models, copyeditors, everyone—not to mention the bake sale buyers and party goers who helped us raise the money to print this baby. It was not easy, nor did I expect it to be. But the experience of putting this mag together with so many talented people has been invaluable and a lot of fun. We've already started on the next issue, due out in the spring.


vive has a very similar look and aesthetic to what we do here on Burgundy Girls, so if you love us (or love our blog) then you'll enjoy the mag as well. And, if you zoom in just enough, you'll see an article written by Amanda! (And seriously, it's a good one.) We'll soon post a list of the shops and cafes in Toronto where you can find vive, so check back on the blog if you want to get your hands on an issue!

We are always looking for new contributors—writers, photographers, illustrators, bloggers, etc., so please get in touch at sayhi@vivemagazine.ca if you are interested.


Oh, and one more thing. I love working for a print magazine, but the digital version is very special to me, because—let's be real—it will be able to spread faster, be seen by more people, and generally be able to go further than print can. This year, we will be releasing an online-only version or two, and I'm excited to take advantage of the digital platform and push the envelope a bit.


Friday, January 27, 2012

Shades of Beige

A few things that caught my eye this week.


Miss Moss posted about these way cool editions of Lucas Massen pieces, which he's hired his young sons to paint. Dutch labour laws mean the kids can only work for 3 hours per week, hence the unfinished nature of the items. Such a beautiful result, and a pretty easy DIY, I think.

via Need Supply

It's not even February and I'm already dreaming about summer footwear. These Azores sandals from Jeffrey Campbell are pretty much my ideal pair – minimal and entirely adjustable, swoon! (Having long, skinny feet will do that to you).

via

Brown sugar blueberry cookies. I can't even, you guys. These are next up on my To-Bake list.

via Found

I saw this Found leash in person at Fetch Canine Social Club on Roncesvalles last weekend and I've been thinking about it ever since. Sure, it's a $60 leash, but it can also be clipped cross-body style so you can walk your dog handsfree. Plus, it's all made with all weather marine rope and was founded with rescue animals in mind. I've already started saving up my pennies.


images via etsy

Speaking of saving up my pennies,  how beautiful are these waxed canvas bags from Southern Field Industries? They look like the perfect size and I love the colour combinations, especially the red+natural and turquoise +tan.

For more of what I'm finding, you can always check my Pinterest.

Have a happy weekend, everyone!

Friday, January 6, 2012

On inspiration

I've been thinking a lot about inspiration—where it comes from, what it means, and why a particular idea or act can cause such a knee jerk reaction of "I've got to get in on that!"

Here is the original post I was going to share with you today. It's called "Things I've done and made that I love"

NAILS:
I am notoriously bad at painting my nails, but I've been practicing this whole nail art thing and getting a lot better. I like to think of these as like part of a Grace Hartigan painting. 


EYES:
Now I know she didn't make it up herself, but I've been learning so much from FASHION's Paige Dzenis about how to apply makeup, including my new favourite style—the kitten flick. I always feel self-conscious about wearing my regular heavy eye makeup in the morning, but, as you can see, this style is pretty understated when your eyes are open, and just a little retro. 


ACCESSORIES:
After reading a hundred and one DIY collar tutorials, I finally got around to making my own. The collar's from an old thrifted shirt that I was never going to wear, and I got these round studs a few years ago. I always feel silly when a project I've been meaning to do for months takes me about five minutes to complete. 


As I was putting these pics and captions together, I was reading this NYTimes article called "The Joy of Quiet." I'm a sucker for anything that toutes the idea of a simpler life, so I dropped everything to read about what I thought would be the benefits of having some quiet time. And it was about that, but it also touched on a more important idea, about the "urgency of slowing down" and unplugging.

 "I read an interview with the perennially cutting-edge designer Philippe Starck. What allowed him to remain so consistently ahead of the curve? 'I never read any magazines or watch TV,' he said, perhaps a little hyperbolically. 'Nor do I go to cocktail parties, dinners or anything like that.' He lived outside conventional ideas, he implied, because 'I live alone mostly, in the middle of nowhere.'

I often find myself wondering when the last time was that I had an original thought or idea. I feel inspired a lot (I'm feeling inspired by this article, even!). As a blogger, copyeditor, editor, writer, and avid Google Reader user, I am constantly on top of news in the worlds of fashion, food, and literature. I'm inundated with great ideas coming from smart, creative people—so much so that perhaps it's a detriment to my own creativity.

It's arguable, I've heard it said many times, that there are no new ideas, and that everything has been done before. And being inspired by people is a way to open your mind to new thoughts and experiences, which is, obviously, invaluable. But what can happen if you aren't following anyone else's rules? Is being outside the influence of others a way to push to envelope and create new and exciting content? Or do you have to be plugged in in order to see what direction media is headed?

I've got no answers here, only more questions, which—if you get drunk with me anytime in the near future—will be a major topic of conversation. I'll be doing a lot more thinking about this, and I promise that us Burgundy Girls will keep our content as creative as our busy schedules permit. 

Do you have any thoughts about all this stuff? Inspire me! 


Tuesday, December 27, 2011

Eat It: Eggless Carrot Nog

I hope you all had a wonderful holiday, guys. I've been holed up at my parents' house the past few days and it's been pretty great. My parents are dogsitting the world's sweetest toy poodle, Mia, and Charlie is just beside himself, trying to get her to play with him. We just watch the action from the sidelines, aka. the couch, while running marathons of House Hunters and drinking eggless nog.
Mia. She weighs maybe 4 lbs, tops.

Eggless nog, you ask? Well, my mom is severely allergic to eggs, so this year I made it my mission to whip up a batch of frothy goodness that she could enjoy too. And boy, was this stuff good.

Creamy, thick and better for you than traditional nog, it tastes like spending the holidays in Hawaii, due to the coconutty flavour it's sporting. It's a pretty orange colour, and as an added bonus it's lactose-free, so my fellow lactards can enjoy copious amounts without feeling hella bloated/smoking out the family. It's pretty sweet, so I'd recommend cutting it with some dark or spiced rum, or do as I've been doing and use it to whiten your coffee – it makes your morning cuppa taste just like pumpkin pie.


Eggless Carrot Nog
Adapted from here
Makes 2 cups

1/3 cup coconut milk (I used cream of coconut, which is slightly creamier)
1/2 cup carrot juice
1 1/4 cups vanilla soy milk
1/4 teaspoon cinnamon
1/8 teaspoon nutmeg

Put all ingredients in a blender or use an immersion blender for at least 2 minutes to whip all ingredients together.


Cheers!

Wednesday, November 16, 2011

My Easy Morning Muffins

Mornings are always stressful when you work 9 to 5 (or 10 to 5... or freelance from your bed), and eating breakfast isn't always a top priority. I thought I'd share with you a little trick I've got up my sleeve that allows me to sleep in a little most mornings and still have a bite before I fly out the door.

I am totally disabled when it comes to baking, but these are easy, fast, delicious, and healthy—so they'll start your day off right.

Whole Wheat Banana Bread Muffins
A 100% Laura Kathleen original recipe


Make a batch of these babies for the week. Stick 'em in the freezer and toast one or two in the morning. You can spread some butter or jam on them or just eat them as is while you are running for the streetcar.


1. Preheat your oven to 325.


2. Select three or four or your brownest, most overripe bananas and mash them with a fork.


You'll want the mashed bananas to look like this. Make sure you leave some chunks in there.


3. Melt about half a cup of butter. This is never glamorous. Do whatever you have to do to get that butter into liquid form.


4. Take all these ingredients—that's 1 cup of sugar, 1.5 cups of whole wheat flour, 1 tsp each of baking soda, salt, and vanilla, and one egg—and mix them together with the bananas. Chocolate chips are another welcome addition.


The mixture should look like this.


5. Grease a muffin tin, fill 'em up, and put the delicious mixture into the oven. Bake for about 25 minutes, but keep an eye on them.


6. Tell your boyfriend that the only way he is allowed to eat any is if he cleans up and does the dishes. There are usually a lot of dishes and a big mess involved when I make these muffins.

7. When the muffins are done you'll be able to tell because the smell will be so overwhelming that you can't wait anymore. You'll also be able to stick a fork in and have it be fairly clean when it comes out. I like my muffins a little more gooey than that, though.


8. Eat one of those bad boys right away. They are so tasty when first out of the oven. Freeze the rest and look forward to getting up every morning so you can have another.